![]()
A few days ago, I was working in a project to move an environment to the Azure Cloud.
After some research we decided to give Azure Site Recovery a try, since it could copy our VMs online, we would get almost no downtime with the migration. We spawned two brand new VMs on-premises, one Windows VM and one Linux VM. Then we configured the vault and the VM replication for those tests VMs.
It worked like a charm. Almost no downtime. Then we agreed that it should be our best way to move a bunch of VMs.
Everything was working great until we hit an specific Windows VM.
Symptoms
We’ve configured the replication and waited a long time until it was 100% synced over a 20Mbit link shared among other things. Then we scheduled a downtime to perform the failover. Since we were confident from the other VMs we didn’t performed a ‘Test failover’ (bad idea!).
After performing a ‘Planned Failover’, we waited a long time for it to come up, but it never did.
Then, I’ve enabled the Boot Diagnostics to get a screenshot and found an unbootable machine.
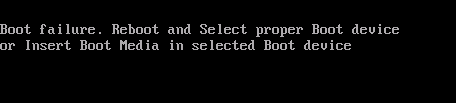
Diagnosing
What the heck? What this VM has different from the other ones?
My first guess was a wrong configuration, because would’ve selected the wrong OS disk during the configuration.
Well, this VM came from a P2V process in the past using SCVMM. During this process, this machine got a really weird disk configuration.
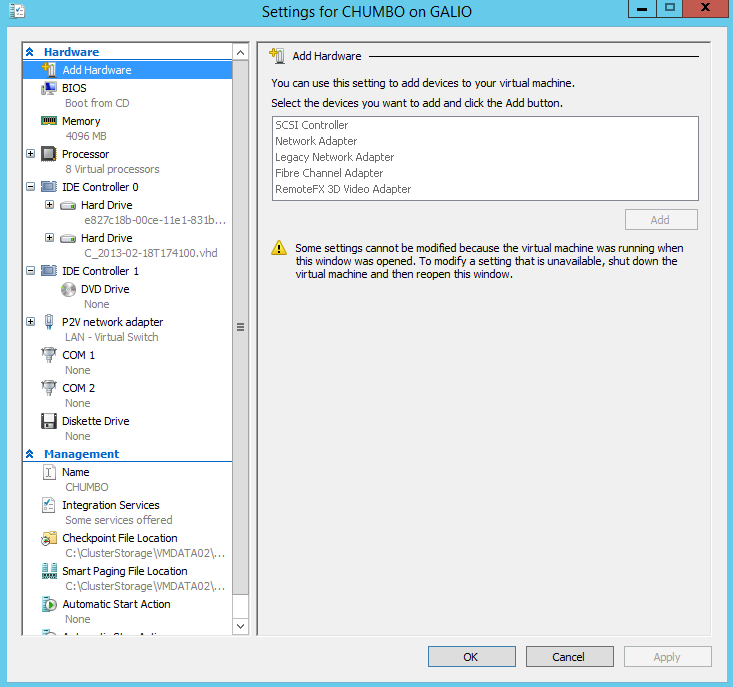
The Site Recovery asks you what is the ‘OS Disk’ during the configuration, I’ve selected C_2013-02-18T174100.vhd since it holds the OS C:\Windows, but e827c18b-00ce-11e1831b...vhd holds Windows boot loader.
By the error message I guess I should’ve selected that disk e827c18b-00ce-11e1831b...vhd as the ‘OS Disk’, then I’ve created a new VM swapping the disks, so Azure will find the boot loader that appear to be missing.
It partially worked. At least the error message has changed.
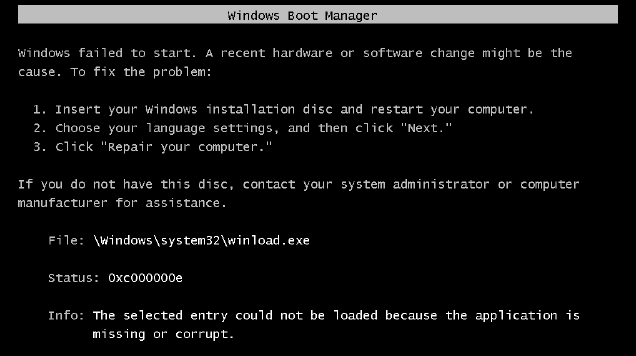
Now, the boot process has started, but the boot loader was unable to find the OS itself.
It brought up a new question, why the boot loader is unable to find the OS?
It started to sound that it would take a long time to find it out, then we aborted the migration for this machine and restarted it on-premises.
When I got the machine online on-premises, I’ve gone over all BCD configuration and it looked fine.
So, I started to wonder what could cause the OS disk to be unreachable and what is the “disk configuration” at a given Azure VM in terms of the hardware abstraction layer (HAL).
To get more info I’ve used another migrated VM that had also gone over a P2V process in the past and worked. This VM also has a bunch of disks (VHDs) attached to it.
Checking this machine using Windows Device Manager gave me an really important clue. Check this out.
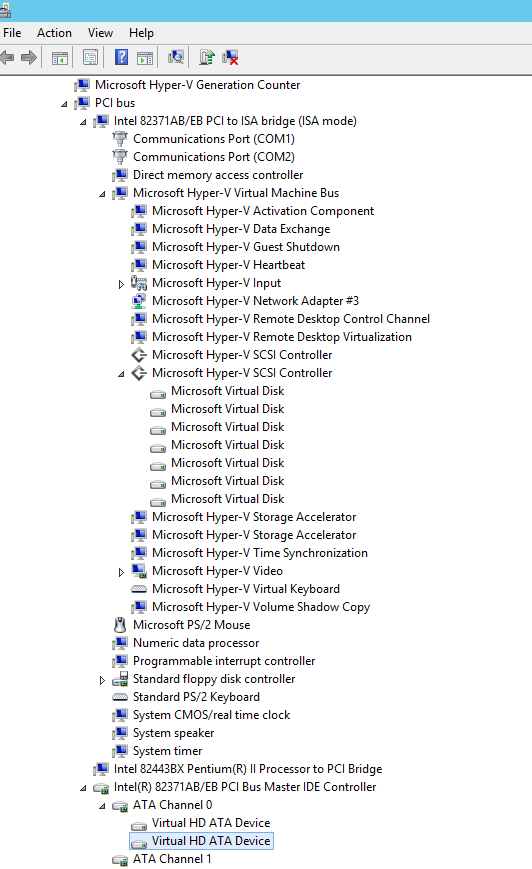
It’s important to notice that this machine shows only two devices attached to the IDE controller. One is a disk is the ‘OS Disk’ and the other is the ‘Temporary Storage’ that azure provides to every VM.
All other disks are connected to ‘Microsoft Hyper-V SCSI Controller’. This controller is a synthetic device! It requires the VMBUS to be up and running to be accessed, but the VMBUS will go online only when the driver for it is loaded.
We ran into a chicken and egg problem. The boot loader couldn’t find the ‘OS Disk’ because it’s attached to device that will be available only after the OS is loaded.
Fixing it
So, to get this this machine bootable the Boot loader and the OS must be in the same VHD.
To achieve this I had to use an Ubuntu with the two disks from the Windows machine and a new one large enough to merge things.
1 | (parted) print devices |
Merging both disks
Checking size of the System Partition
1 | (parted) select /dev/sdc |
Checking size of the OS Partition
1 | (parted) select /dev/sdd |
Create the partition table at the target disk
1 | (parted) select /dev/sde |
Copying data to the target disk
1 | root@RECOVERY1:~# dd if=/dev/sdc1 of=/dev/sde1 bs=512M |
Adjusting the boot loader
Now we’ve to adjust the boot loader configuration to tell it to
look for the OS at the same disk.
To do that we’ve to use BCDEdit at a Windows machine.
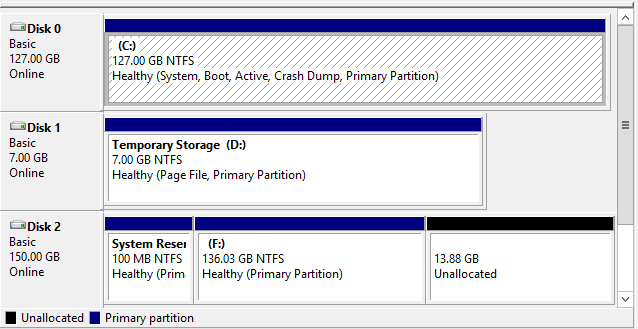
After spinning up a Windows Server and attaching the new disk, the Disk Management shows like this:
Reconfiguring the boot loader
1 | C:\Users\jrocha>bcdedit /store E:\boot\bcd /enum /v |
Pay attention to device: unknown at both sections of BCD store.
It will render the machine unbootable, to solve it we’ve to do this:
1 | bcdedit /store E:\boot\bcd /set {bootmgr} device partition=E: |
Now it should be great, just checking.
1 | C:\Users\jrocha>bcdedit /store E:\boot\bcd /enum /v |
Conclusion
It seems like that Azure VMs are prepared to run just one VHD attached to the IDE Controller.
All other disks are connected via the VMBUS showing up like a SCSI disk.
I guess all data access to a data disk should be faster than over an emulated IDE channel,
I think we can take it as heads up to avoid IO at the OS Disk in an Azure VM.
I don’t know the Azure Site Recovery have any plans to fix that or accept it as a behavior by design,
but if you have non-standard disk configuration and you are planning to move that VM to azure using this great tool, be careful!